
Projects :: FT-991(A) PTT and microphone adapter
Many modern SSB radios seem to have poor AM performance - something that draws criticism from self-build old-timers who like to modulate more than 80%! The FT-991(A) supplied dynamic microphone seems to have plenty of punch on SSB, but was lacking on AM, even with the gain set to 100. The DTMF microphone made some improvement and drew fewer complaints; however, it did not solve all of the issues; and holding a fist mic can soon lead to a painful thumb! The quest was on to find an alternative solution without spending loads of money on branded desk microphones with their super response up to 15 kHz. You need that much audio response when the internal filters roll-off at 3 kHz!!
The FT-991(A) does not offer a simple solution to connect an external non-standard microphone. Adapter cables converting the RJ-45 to a multi-pin microphone connector are available - at a cost; and you still need to create a multi-pin to something adapter. There had to be an easier way. And there is: (at the time of writing) the supplied dynamic microphone lead has an RJ-45 to RJ-45 lead that unplugs [from the microphone]. That suggested the use of an RJ-45 break-out box to allow the construction of a simple interface without resorting to RJ-45 connectors and crimp-tools.
A quick search of the Internet turned up an RJ-45 inline socket. The IDC "punch-down" connectors allow the creation of network extension leads.
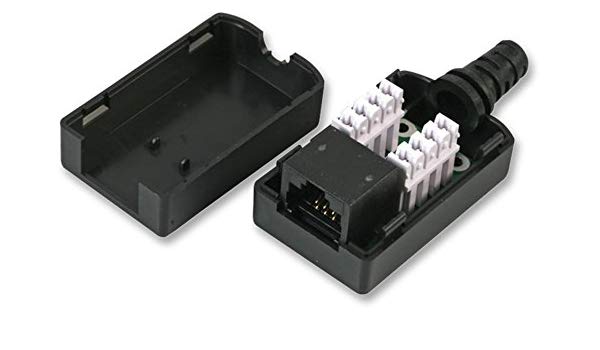
I used the SILBLK model made by TUK Ltd. An internet search for "SILBLK TUK Inline socket" or "RJ-45 inline socket" should provide a list of suppliers (or equivalents). I recommend ordering a couple in case your modifications go wrong! I removed the IDC connectors with a large soldering iron. This still proved tricky due to the amount of heat that was transferred to the IDC metal parts. The removal resulted in a couple of the tracks coming away, although thankfully, they were not needed. I would recommend using a rotary cutting tool to remove as much of the IDC parts as possible before removing the rest with a soldering iron. This should reduce the heat-stress on the PCB.
You will need a method of connecting to an external microphone and an external PTT. In my case, I had a foot-switch with an existing phono (RCA) connector already fitted, so I cut-down a small phono splitter lead. The desk microphone recommended to me is designed to attach to a computer's sound card, so the use of a stereo 3.5 mm connector seemed appropriate.

The above picture is my mark-1 build. The pre-moulded connectors are thanks to cutting down cheap existing pre-moulded adapters/extension-cables. The LED is a 3 mm self-changing RGB model with a 200 Ohm limiting resistor. The LED clip required a small hole drilling in the top of the case. The LED serves to demonstrate the connector is sound and the radio is powered up; and it's cool!
Pin out
The following pin-out is based on the numbers printed on the PCB.
- 4: Mic ground
- 5: Mic input 1
- 7: Ground
- 6: PTT 2
- 3: +5 Vdc 3
Note 1: Connect both Left and Right signals from the 3.5 mm connector to this pin.
Note 2: Open circuit for receive. Short to ground for transmit. PTT connects to 6 and 7.
Note 3: Optional supply for LED with ground on pin 7.
You may wish to verify the above against the schematic for the dynamic microphone. I found the pin-numbers need to be reversed on the schematic. A quick reference chart of the RJ-45 lead and the colours is often helpful.
Microphone
Fellow Radio Amateurs recommended the  Neewer NW-700 Condenser Microphone.
I purchased a kit from an ebay seller that includes the microphone; anglepoise stand; desk-clamp; anti-vibration mount; 48V phantom power supply;
XLR to XLR cable; XLR to 3.5mm cable; and two different types of pop shield (not needed as I only listen to rock HI HI). All for £30 with free shipping
(at the time of purchase).
Neewer NW-700 Condenser Microphone.
I purchased a kit from an ebay seller that includes the microphone; anglepoise stand; desk-clamp; anti-vibration mount; 48V phantom power supply;
XLR to XLR cable; XLR to 3.5mm cable; and two different types of pop shield (not needed as I only listen to rock HI HI). All for £30 with free shipping
(at the time of purchase).
On-air reports have been excellent - especially on the AM net (before we switched to FM). I was especially impressed with the power-supply arrangements. It uses a standard mains transformer providing 18 Vac to the NW-100 control box. Inside, a diode/capacitor-pump arrangement increases the voltage before an LM317 regulates it to 48 Vdc. This ticks the no-EMC issues box. A power-cut situation, where I might need to operate from my 115 Ah battery, would require a quick swap back to the standard or DTMF microphone.
Update May 2021: The gain settings required for this microphone vary by mode. AM seems to require full gain (100), whilst SSB and FM require only 30 to 50.
Page updated: 11th May 2021
Home
|
Tips
|
Awards
|
Linux
|
fldigi
|
APRS
|
QSSTV
|
WSJT-X
|
Projects
|
PSU
|
Repairs
|
Downloads
|
Links
SSTV Gallery
|
eQSL Gallery
|
MQ0PLT eQSL Gallery
|
MQ0PLT eQSL Awards