
fldigi | Linux | FT-991(A)
Intro
This page describes how to set-up your Yaesu FT-991(A) to work with fldigi. Whilst it is aimed at those using CentOS, many of the settings will work with Fedora, Ubuntu, SuSE, MacOS, and Microsoft Windows. You may also be able to use this guide with the Yaesu SCU-17 and transceivers such as the Yaesu FTDX-1200.
Update January 2018: I have been running CentOS 7 for several months along with the latest version of fldigi from EPEL. At the time of writing the version is: 4.0.13-1. The set-up instructions below should work as a guide.
Update December 2020: settings checked against version 4.1.06.
Update February 2023: Running Rocky Linux 8 instead of CentOS 7, but I have not had time to play with fldigi. I also need to update this page to reflect package availability for Rocky Linux.
Pre-requisites
You will need to install the  Extra Packages for Linux (EPEL) repository in order to install fldigi on CentOS.
For CentOS 7, simply enter sudo yum -y install epel-release in a terminal window.
Extra Packages for Linux (EPEL) repository in order to install fldigi on CentOS.
For CentOS 7, simply enter sudo yum -y install epel-release in a terminal window.
Permissions
You will need to add your user ID to the dialout group in order to access /dev/ttyS* and /dev/ttyUSB* devices.
You can achieve this via the command line. Open a terminal window and enter the following:
sudo usermod -a -G dialout $USER
Where $USER is the username you use to login to your Linux PC. The super-user-do command assumes you have that set-up correctly. Run the command sudo su- and enter the root password if you need to escalate your priveleges to enter the previous command correctly. On CentOS/RHEL/Rocky/Fedora Linux systems, you can use the above command to add yourself to the wheel group, then modify /etc/sudoers to allow the wheel group to sudo with no password.
You may need to restart your Linux PC to ensure the group changes are picked-up by the applications you are trying to run.
Set-up
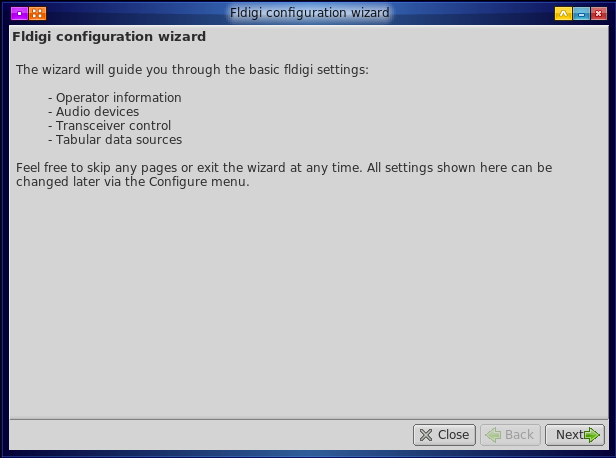
With fldigi installed, you can start the application and configure it for your station. Click Next on the first screen.
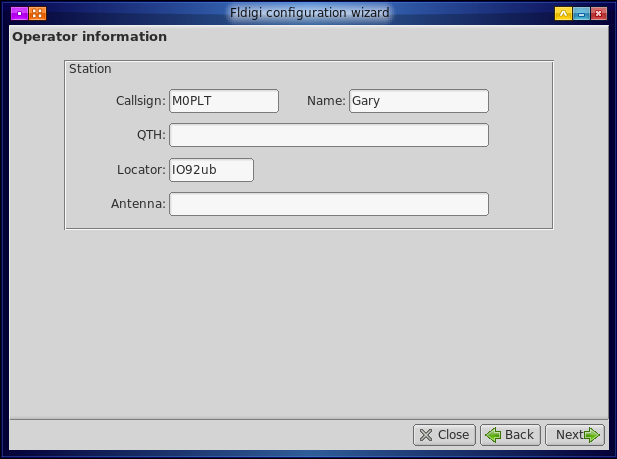
Enter the details of your station, such as your call-sign, name, QTH, Maidenhead locator, and any aerial details you might want to list. Click Next.
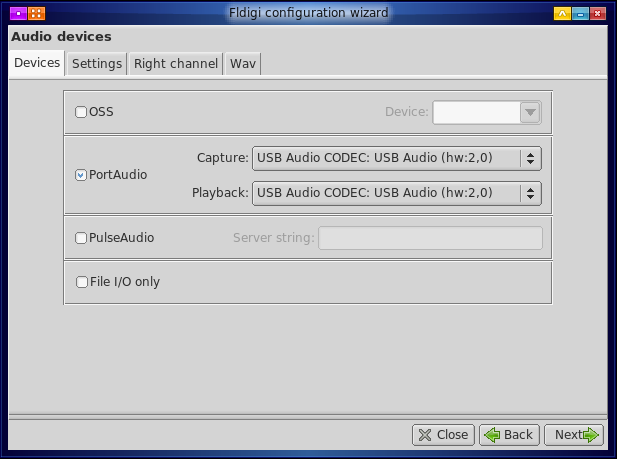
Tick the portaudio box and select the USB audio interface inside the FT-991(A) for capture and playback. Click Next.
The very nice people at fldigi have made a RigCAT file to provide CAT controls for the radio.
Browse to the Sourceforge site
https://sourceforge.net/projects/fldigi/files/xmls/yaesu/
and download the FT-991.xml file to .fldigi/rigs.
Click on the Rigcat tab, then the open button. The FT-991.xml file should be already visible. Select it and click OK.
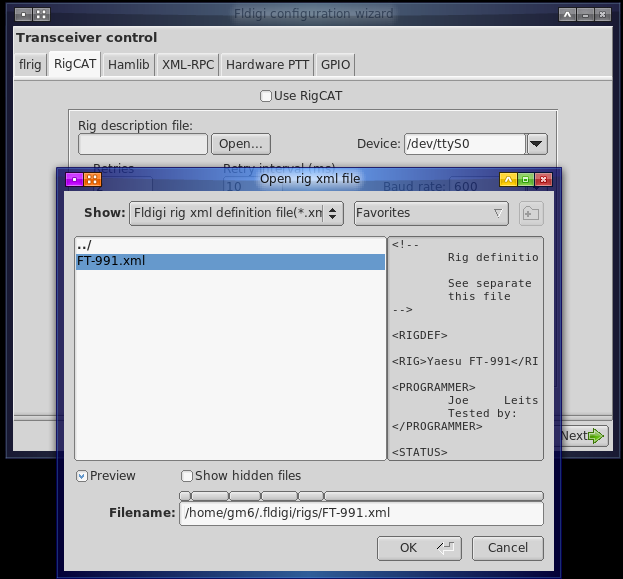
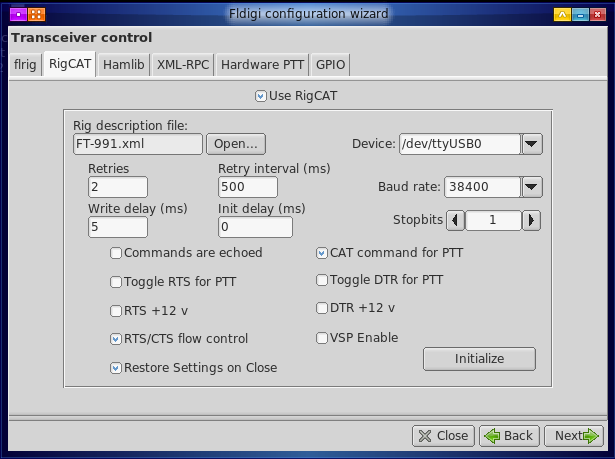
Tick to use RigCAT and set your controls as in the screenshot below. Remember to pull-down to use /dev/ttyUSB0. You will need to ensure your radio's menu 031 is set to 38400bps.
In order to correctly use /dev/ttyUSB0, you should have followed the tips -link to page- on allowing your user ID to access the dialout group.
Click the Initialize button to check that the software can talk to the radio. This requires power to the radio, but it does not have to be switched on.
Click Next when you are happy.
Click Finish and the full application will start.
For the curious - the above screen shots are decorated with the Emerald Slatehorn_Blue theme.
Configure the FT-991(A)
The following menu settings should allow you to use fldigi with your FT-991(A).
- 062 DATA MODE - OTHERS
- 064 OTHER DISP (SSB) - 1500
- 065 OTHER SHIFT (SSB) - 1500
- 070 DATA IN SELECT - REAR
- 072 DATA PORT SELECT - USB
Update: 9th December 2020 - after some sanity checking with my Radio Test-Set, I have revised the settings.
Menu 062 (DATA MODE) set to OTHERS as with WSJT-X.
Menu 064 and 065 may be set to 300Hz by errant software settings. The offset will mess with digi-modes and WSJT-X, so check they are both set to 1500; and if you use programming software, check the settings are set to 1500.
Menu 070 selects for the Universal Serial Bus attached sound card. 072 selects the Universal Serial Bus sound card as the audio source.
Set the width to 3000! By default, the DATA mode selects a 500Hz width. To use fldigi correctly, you need to press the F (M-List) button, scroll through to the WIDTH button (next to the FWD button), press it, then use the multi knob to open it up to 3000Hz. You will hear a change in the received audio if you happen to be tuned to a digimode frequency.
Press the LOCK button! Do not run the risk of going off frequency by leaving the VFO knob unlocked!!
Configure fldigi
You can set frequencies and modes for easy recall by clicking on the 'open list' icon. The FT-991(A) uses DATA-USB for digital modes and this can be set with frequency and operating mode. The easiest way to set-up the list is to edit the frequencies2.txt file found in the .fldigi directory. If it does not exist, you can create one with a text editor.
Here is my frequency2.txt file containing the DATA-USB settings and frequencies for IARU Region 1 data-modes. Feel free to download and adjust as required.
# rfcarrier rig_mode carrier mode
1810000 DATA-USB 700 CW
1838000 DATA-USB 1000 BPSK31
1838000 DATA-USB 1500 Olivia-16/500
3505000 DATA-USB 700 CW
3580000 DATA-USB 1000 BPSK31
3581750 DATA-USB 1500 Olivia-16/500
5363000 DATA-USB 1000 BPSK31
5366500 DATA-USB 1500 Olivia-16/500
7005000 DATA-USB 700 CW
7040000 DATA-USB 1000 BPSK31
7041750 DATA-USB 1500 Olivia-16/500
10135000 DATA-USB 1000 BPSK31
10141750 DATA-USB 1500 Olivia-16/500
14005000 DATA-USB 700 CW
14070000 DATA-USB 1000 BPSK31
14073900 DATA-USB 1500 Olivia-16/500
18100000 DATA-USB 1000 BPSK31
18101900 DATA-USB 1500 Olivia-16/500
21005000 DATA-USB 700 CW
21070000 DATA-USB 1000 BPSK31
21085750 DATA-USB 1500 Olivia-16/500
24920000 DATA-USB 1000 BPSK31
24921250 DATA-USB 1500 Olivia-16/500
28005000 DATA-USB 700 CW
28075250 DATA-USB 1500 Olivia-16/500
28120000 DATA-USB 1000 BPSK31
144135500 DATA-USB 1500 Olivia-16/500
144138000 DATA-USB 1000 BPSK31
432088000 DATA-USB 1000 BPSK31
This is not an exhaustive list, however, I hope it serves as a guide to setting up DATA-USB and various digital modes. Drop me an email if you want to share your frequency list with others via my website. The highlighted frequencies can only be used if you hold a United Kingdom Full Amateur Radio licence. Radio stations outside of the UK should check their local licensing requirements for the 60 metre band.
If you are new to digital modes, I would suggest you read through the fldigi help to get a feel for the software; and when you are ready to transmit, testing into a dummy-load is always a good idea!
Tip: using DATA-USB means the dial-frequency set above is the suppressed-carrier frequency. The audio frequency you select in fldigi will produce a signal above the dial-frequency. The actual frequency you are transmitting on is listed in the Freq box, as in this example:
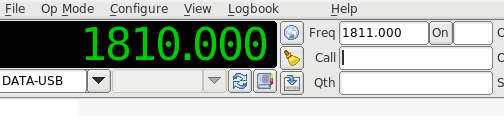
With a dial-frequency of 1810 kHz, and an audio frequency of 1 kHz, the transmit signal is on 1811 kHz. This is important if you use fldigi for CW mode. Set the dial-frequency to the bottom of the band, and you will be able to see CW signals over approximately 3000 Hz.
Enjoy!
Page updated: 15th February 2023
Home
|
Tips
|
Awards
|
Linux
|
fldigi
|
APRS
|
QSSTV
|
WSJT-X
|
Projects
|
PSU
|
Repairs
|
Downloads
|
Links
SSTV Gallery
|
eQSL Gallery
|
MQ0PLT eQSL Gallery
|
MQ0PLT eQSL Awards